My family often eats ham on New Year’s Eve. This year we were up at the chalet and I was in charge of groceries so I (deliberately) went a little overboard and got an enormous bone-in, spiral cut, cooked ham.
For the dinner itself, I heated the ham in the oven and served it with two salads, a green salad with diced apple and celery and vinaigrette, and a chopped cherry tomato and avocado salad with balsamic vinegar and olive oil.
For dessert I made Dump Cake, which is a classic kid-chef-friendly recipe. I’ve seen the recipe a few places with a few variations (ie. adding nuts or chocolate chips), but the basic instructions are: Dump into a baking pan, in this order (without stirring, but try to spread the layers evenly), 1 can undrained crushed pineapple, 1 can fruit pie filling (I used strawberry rhubarb), and 1 box yellow cake mix; top with 2 sticks of butter each cut into 12 slices; and bake for 1 hour at 350°F. It comes out as more of a cobbler than a cake and is absolutely delicious, hot or cold.
When I came home, I had about 2/3 of the ham, including the bone, left, and I have made making the most (so to speak) of the leftovers, and let me tell you, they have been tasting souper…heheheh.
I started by cutting the ham off the bone as closely as I could and dicing it. I used about half of that ham to make my first soup, ham, leek, and potato. Sadly, I was engrossed in the process and forgot to take pictures of that one. Please take my word for it – it looked a-FREAKING-mazing.
Ham, Leek and Potato Soup
Ingredients (all amounts are VERY approximate)
- 3 cups diced cooked ham
- 3 cups 1/2″ cubed Yukon gold potatoes, unpeeled
- 3 stalks leeks, finely chopped and WELL rinsed
- 1 can evaporated milk
- combination of about 1/3 milk to 2/3 water to just cover ham and vegetables
Cook the leeks and ham in a little bit of oil in large pot until leeks are soft and slightly browned. Dump everything else into the pot. Bring to a boil and then lower to a gentle simmer. Leave it alone for an hour or so. Come back and add some cream and a cornstarch slurry if you like a thick soup. Serve with a really lovely artisanal bread, preferably potato scallion or whole garlic clove or the like.
While that soup was simmering, I used a little bit of the remaining diced ham to make dinner for the kids – “Dora’s Empanadas” from the Dora and Diego Let’s Cook cookbook that Molly got for Christmas from her cousins. Basically, you make a filling out of diced stuff (I used carrots, peas, ham, and grated cheese), cut circles of of refrigerated pre-made pie crust, fill, fold over pastry and seal edges, and bake for 12-14 minutes at 400°F. I put the rest of the diced ham in a large freezer bag and froze it.
Finally, I made ham stock: I put the ham-bone in a large pot, added about a handful each of roughly chopped carrot, onion, and celery and a handful of bay leaves and peppercorns, filled the pot with water, turned on the heat and left it all to simmer for hours and hours and hours. After what was probably actually 2-3 hours, I turned off the heat and left it to cool, then strained it and poured it into containers to freeze. It made about 8 cups of stock in all.
Phew! That was the end of my January 2nd.
The next soup I made was a brilliantly purple concoction that couldn’t be beet! (Okay, I’ll be honest – I did that for comic effect. It was in fact mostly beet.) I rooted around in my vegetable drawer for just the right veggies to roast for it. This thick, winter soup would be just the thing to keep you kale and hearty… All right, I’m done. For now. Here’s the recipe:
Roasted Vegetable Soup with Kale
Ingredients (again, all amounts are VERY approximate)
- Various vegetables, emphasis on roots – I used beets, carrots, onions, parsnips, and one sad-looking wrinkly zucchini that I found in the back of the crisper – scrubbed, ends trimmed off, peeled if necessary (I peeled the onions, carrots, and parsnips but not the beets), and chopped into large pieces of 1 1/2 – 2 inches
- mix of ham stock, water, and red wine to cover vegetables (I used about 2 cups ham stock, 1 cup red wine, about 1 cup apple cider and enough water to make up the difference)
- 3/4 of a bunch of kale, stems included, chopped (I had used the rest in a fettucine carbonara as I couldn’t find basil – also not a bad call)
- olive oil, salt and pepper, and bay leaves
Dump vegetables except for kale into a roasting pan, drizzle with olive oil and season with salt and fresh-ground pepper. Roast in 450°F oven until soft enough to pierce with a fork, about 45 minutes.
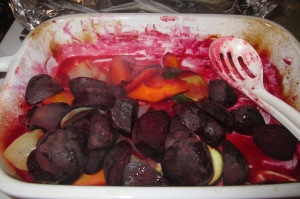
Some of the vegetables post-roasting.
©PicklesINK 2012
Scoop vegetables into large pot. Deglaze roasting pan with a little bit of water to get every last bit of roasty goodness and dump that liquid into the pot too. Add enough ham stock, red wine, cider, and water to cover vegetables. (This could of course be made vegetarian and/or alcohol-free using vegetable stock and/or more cider or other juice.) My ham stock and red wine were both frozen, so I just dumped in the cubes and let them melt on the stove. NB – I freeze my leftover wine before it goes bad. I have seen it suggested that you freeze it in ice cube trays and then store in freezer bags. I tried that and it leaked EVERYWHERE – wine doesn’t freeze completely and the slushy-liquidness will find the tiniest hold in your bag. Now I freeze it in plastic containers.

Roasted vegetables in soup pot with frozen ham stock.
©PicklesINK 2012
Stuff all the kale into the pot on top of the whole mess (Don’t panic – the kale will shrink significantly as it cooks!)

Masses of kale covering everything else.
©PicklesINK 2012
Toss in a few bay leaves, put a lid on it, and leave it to simmer for a couple of hours.

Violently purple soup cooking (see how the kale has shrunk to practically nothing)
©PicklesINK 2012
When it looks and smells lovely (assuming you like beets – otherwise, when it looks and smells revolting, but if you don’t like beets I have to question your judgment in making this particular soup as I was pretty up front about the ingredients), puree with a hand blender. It should be really thick and hearty and purple and ready to stain anything it touches. If you don’t have a hand blender, let it cool, then transfer to a blender and puree, then transfer back to the pot and reheat why don’t you? Go to the store right now and get a freaking hand blender because it’s the greatest small kitchen appliance you will ever own, especially if you like making soup.

Pureed roasted vegetable soup
©PicklesINK 2012
Ladle into a bowl, top with something a little sour like sauerkraut, sour cream, plain yoghurt, or blue cheese, and enjoy.
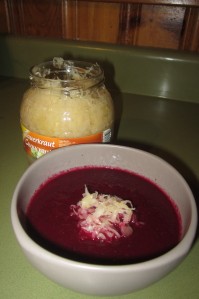
Roasted Vegetable soup topped with sauerkraut
©PicklesINK 2012
Try not to eat it all in one sitting, though, because there is a curious physiological effect to eating a lot of beets at once. You’ve been warned.
Finally, remembering how when I said, “I have leftover bone-in ham,” my little brother said, “And you’re making split-pea soup, right? WHY AREN’T YOU MAKING SPLIT-PEA SOUP RIGHT NOW?” the final stop on this ham-venture (hmm…weak. Ham-scusion? Ham-Odyssey? No, they’re getting worse. I guess I’d better let sleeping pigs lie) was of course split-pea soup. Especially after Ben saw the last one and said, “Molly, mommy made purple soup! Your favourite colour! Mommy, will you make green soup for me?” I made it on a night that Ian was away because he claims to not like it even though I tell him over and over that all I am saying is give peas a chance…
Anyway, this was the simplest of them all.
Split Pea and Ham Soup
Ingredients
Fine, I’ll give you more than that:
- 3 cups dried quick-cooking split peas (I used a mix of green and yellow)
- 2 cups diced ham (remember that bag of ham I froze?)
- 8 cups ham stock

Dried green and yellow split peas awaiting their
tragic yet delicious fate
©PicklesINK 2012
Rinse and drain split peas and add to ham stock in large pot.
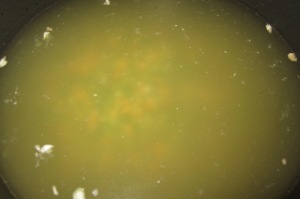
Split peas and ham stock in my giant soup pot
©PicklesINK 2012
Bring to a boil, then reduce to a simmer. Leave it alone for an hour. Puree a little (leave it lumpy) with your hand blender while whispering lovingly to said blender, “How could I ever have lived without you, my precious?” and then add the ham.
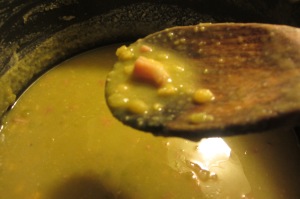
Mmmm…pot of simmering split-pea and ham soup
©PicklesINK 2012
Simmer a little longer to let all the flavours combine, then serve. It will thicken up quite a lot as it cools and be gorgeous and murky and pea-soupy and delicious.

Bowl of hearty green split-pea and ham soup
©PicklesINK 2012
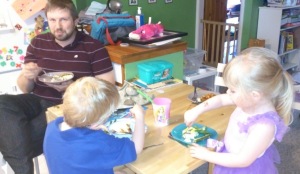
My notoriously picky eater, Ben (who has actually come A LONG WAY in the last few months) said, “Mommy, what are you making for dinner? It smells really yummy,” when he got home from school, and on tasting it, pronounced, “Mmm! This is really good! I LOVE this soup! Did you hear what I said? I don’t just like it, I love it!!” Molly said decidedly, “I DON’T like it,” and then proceeded to scrape her bowl clean before Ben was halfway through his.
I call that a win all around!
Sadly, I am now out of ham stock until I invest in another basketball-sized lump of pink goodness.
~ karyn
Have you made it through your holiday leftovers? What did you do with them?


