A few days back, in the middle of a marathon laundry session, my front-load washing machine started gushing water out of the soap dispenser drawer. I shrieked for help and Molly and Ben raced upstairs and brought me back every towel in the house.*
Now, the last two times I have had appliances break down on me (washing machine and dishwasher), I called a local appliance-fixing guy named Dave, who each time spent about 15 minutes unscrewing a panel, unclogging a hose, and laughing at his own sexist jokes, charged me $300, and left, both times leaving the panel off and saying, “Yer husband can put that back on when he gets home from werk.” I mean, don’t get me wrong, he was nice and all…
So this time I thought, “What the hell? I’ll give it a shot. The worst that happens is I can’t fix it and have to call someone anyway.”
The next step was of course to contact my old pal Google for inspiration. Google said, “Hey babe! Been missing you! We should totally catch up some…what? Washing machine issues? Wow, so much for small talk. Whatever. Anyway, I know this guy…” and turned me on to the most entertaining washing machine repair video ever. No joke. Watch it through to the end.** Awesome, right?
Armed to the teeth with information, I dropped the kids off at school, dug up Ian’s socket set, and went to work. This is the machine, soap dispenser drawer removed. I’ll recap what you already know from watching the best video ever – When you start the wash cycle, water flows from the pipe in the wall into the “ceiling” of the soap dispenser thingy and dribbles through little holes into the soap/fabric softener drawer, then flows out through a hose which feeds into the drum. If the water is coming out the dispenser drawer, it is most likely because that hose is clogged.
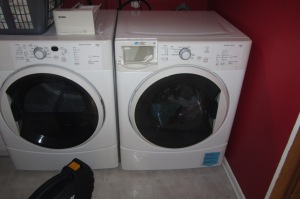
Washing machine (right) with soap dispenser drawer removed.
©PicklesINK 2013
The first step is to remove the washing machine cover. There are 3 hex cap screws/bolts (Some of my engineering-inclined readers may have differing opinions on the terminology so I included both. For their clarification, the items in question are threaded with a tapered end and a hexagonal head requiring the use of a socket tool rather than a screwdriver.) on the back of the machine that must be removed, and then the metal lid lifts off.

Washing machine with cover removed. The white rectangle on the left is the top of the soap dispenser.
©PicklesINK 2013
The black rubber hose in the centre plugs into the drum casing but is not attached with any other hardware, so it just pops in and out. I thought at first that was the hose in question, so I pulled it out and checked. It wasn’t clogged so I plugged it back in. Since I thought that was the only hose, I then removed the panel at the bottom of the machine to check the drain trap. A clogged drain usually results in the washing machine just refusing to drain or to start at all, so if you have that problem, make this the first thing you check. It’s a good idea to check it occasionally anyway as a preventative measure.
Bottom panel removed. The white cylinder is the drain trap. Quite a lot of water comes out when you take the lid off it – I needed more than just that one towel.
©PicklesINK 2013
That also required the removal of 3 screws and then a little bit of wiggling before it popped off. The white thing that looks like the Eye of Sauron is the cover of the drain trap. If you twist it anti-clockwise, stinky water will start dribbling and then pouring out, and if you remove it all the way (I recommend putting some sort of container underneath), the rest of the water plus many small objects you never knew you had lost including usually a couple of dollars in very dirty coins will emerge. It’s a good idea to place a fairly large shallow container underneath to catch the water before you open it (unlike I did).

Containers of narsty water, 2 small socks, and several coins.
©PicklesINK 2013
After emptying the drain trap, I put the cover back on, put the soap drawer back in, started the machine, and…as it turns out, I had not in fact solved the problem. Remembering my Youtube friend’s need for a flashlight, a lightbulb went on over my head and I thought, “Eureka! I didn’t check the right hose!”
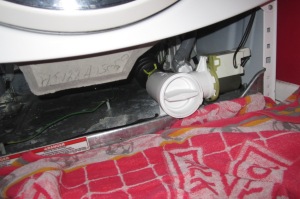
On closer inspection, there is another, larger hose from the main part of the dispenser that you can’t see from above. I felt around inside (sticking my hand under that white box you see in the second picture and reaching towards the front of the machine) and found it, unplugged it (by feel), and lo and behold, a small, wadded up blue sock fell out, rather the worse for the wear for its adventure.

The hose in question, as seen by my camera and flash.
©PicklesINK 2013

The sock that was at the foot of it all. I toed you I could do it!
©PicklesINK 2013
I stuck a finger through to see if there was anything else (there wasn’t), plugged the hose back in (again by feel), and started her up again, and Ta-da!! Success!! No more gushing water, it only took 45 minutes, and I saved $300 and the possibility of assault charges if Dave-the-repair-guy had made another crack about Ben’s kitchen toys being “women’s tools.”
Then, because I’m a jerk, I sent Ian this text:

Text reads: So…Um…Remember when I said I thought I could fix the washing machine by myself?
~ karyn
*I hereby confess to a slight degree of plot-enhancing hyperbole. When I told the story to Ian, Ben corrected me. They did not bring me EVERY towel – as he correctly points out, there were still many dishtowels in the kitchen.
**My favourite part is, “I’ll try to find flashlight to see if I show you hose better. Just bear vith me vell I find flashlight…*camera pointing at floor and bumping around* Ah. Here is flashlight. Sorry about the vait.”