Okay, brace yourself because I know this will come as a shock, but this summer Molly was obsessed with Elsa (I know, right? You never would have guessed!). I decided to earn some preschooler brownie points and get in some sewing practice at the same time, so I designed up an all-season Elsa costume.
At the time I was doing this, Frozen costumes were only available by lottery through Disney stores and on Ebay if you had a spare $600 lying around. As Halloween quickly approaches, they are much more widely available and super-pretty, but nothing beats the feeling of IF I CAN DO THAT I CAN DO FREAKING ANYTHING NOW WATCH ME BUILD A HOMESTEAD AND LIVE OFF THE LAND SKINNING ANTELOPE WITH MY TEETH FOR DINNER that accompanies making your kids’ costumes from scratch. Besides, it’s cheaper and your kids will totally think you’re a superhero.
First I sketched out my idea – Simple bodice, basic gathered skirt, cape down the back. I decided not to do a full sleeve, partly to make my task simpler, and partly to make it suitable for the summer weather. I figured that when it got colder all we had to do was layer it over a long-sleeved shirt. Molly went over my sketches carefully and added her own input.
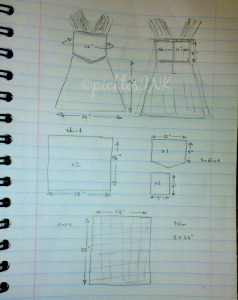
Initial design sketches
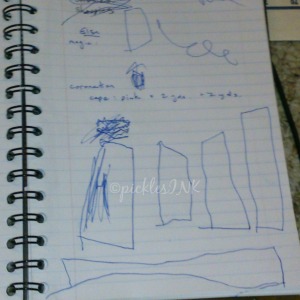
Molly’s design sketches – as you can see they closely mirror mine!
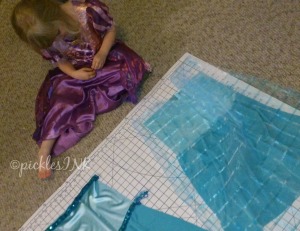
Next Molly and I hit up Lens Mill to scope out our fabric options. After much discussion of colour, sparkle, print, etc. we wound up with a pale turquoise spandex remnant for the bodice, darker turquoise knit for the skirt, pale turquoise organza with a shimmery stripe for the cape, white tulle for the sleeve, and of course, some sequinned trim to add sparkle! Sadly, it was not the right season for snowflake patterns and I quickly vetoed all the glittery fabrics as I am sick to death of being showered in sparkles every time I clean my lint trap. Thanks a lot, official Disney Rapunzel costume.
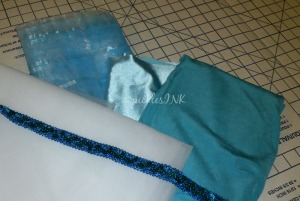
Fabrics for Elsa dress
When we got home, I measured up Monkey:
1. Waist to Armpit = A
2. Waist circumference = B
3. Waist to desired skirt length = C
Then I got to the snipping:
1. Bodice pieces (light turquoise spandex)
Front: rectangle with height = A, width = B/2 (plus seam allowances)
Back: 2 rectangles with height = A, width = B/4 (plus seam allowances)
2. Skirt (darker turquoise stretch):
rectangle with height C, width B x 4 (plus seam allowances)
3. Cape (pale turquoise organza:
rectangle with height A+C, width B x 2
And this is pretty much how it will all go together.
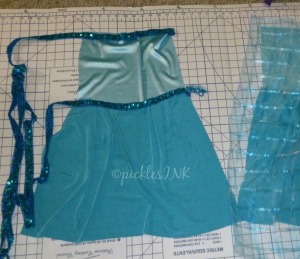
And finally I started the sewing:
1. Bodice: Sew 1 smaller rectangle to each side of the larger rectangle. Hem the top edge.
2. Gather the top of the skirt using your preferred gathering method. Sew the skirt to the bottom edge of the bodice, matching up the sides (these will become the closure and seam at the back).
3. Add your preferred fastening to the back of the bodice and top of the skirt. I put in a zipper, mostly because I wanted to see if I could put in a zipper. If I were to do it again I might use velcro or snaps.
4. Add the “sleeves” – cut 2 wide strips of white tulle long enough to go over the child’s shoulders and tuck into top of the bodice (plus seam allowances). Gather the tulle loosely and sew the ends to the inside top of the bodice at the front and back.
5. Make a rolled hem all the way around the cape. Gather the top of the cape using your preferred method. Now you need to make a decision – do you want the cape to be permanently attached or removable? I decided to make it removable, so I added velcro to the a couple of inches of the top corners of the cape and the back of the bodice on either side. If you opt for permanent, simply sew those couple of inches of cape to the back of the bodice on either side of the closure.
6. Add the trim: I sewed turquoise sequined trim around the waist and around the top of the bodice. I actually hid the velcro for the cape under it so when the cape isn’t attached you can’t see the velcro.
Molly, supervising the operation carefully. Yeah, *that’s* the Rapunzel dress.
Et Voila!! Your little Elsa is ready to fly.
Or at least to wear the dress everywhere she goes…
…whether it’s to the fair…
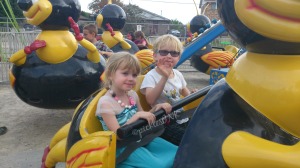
Molly and Ben riding the bumblebees at the fair
…a read-through for her first play…
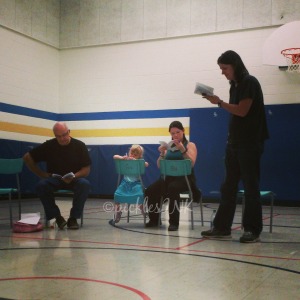
Molly is taking her acting career very seriously.
…or just a night on the town with her favourite wizard.
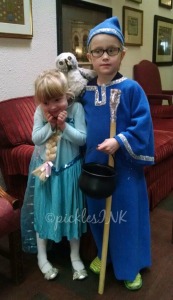
Out and about with her friend Merlin and his trusty owl Feathers.
My conservative estimate is that this dress has been worn approximately 1,000,000 times since I made it a short couple of months ago. Maybe after Halloween she’ll finally be ready to…
….wait for it…
Let it Go?